Monday, 16 July 2012

Featured Recipe

Ok, to be completely honest, I have never had a pulled pork sandwich before. I understand the basics (that pork shoulder cooked low and slow until it's fall-off-the-bone tender and then shredded ("pulled") and simmered in a sweet-smoky sauce and piled high on a soft white bun) but I've never actually eaten one. So when thinking of what to make for dinner tonight (I have been very bad about meal planning and have had to think on the fly for a few days now) I asked my husband to take the pork strips out of the freezer as I was planning to make something with that and some quinoa and whatever few veggies are still in the fridge. He said "we have these really nice buns, why don't you make pulled-pork sandwiches." I said okay but I started to panic a wee bit since, as indicated above, I have never eaten one before and was worried about getting the flavour right. The panic quickly passed and the wheels started turning and what came out tasted "pretty close to bang-on" (according to the hubby). Not bad for trying to re-create a flavour you've never tasted.
These are not "traditional" as I did not cook a pork shoulder for hours and hours until it was uber tender (I cheated and used pork stir fry strips) and I did no actual "pulling" but the flavour was good and they were totally satisfying (and it didn't take me all day).

Pulled Pork Fakies

Ingredients:
1 package uncooked pork stir fry strips (enough for 4 large sandwiches)
2 green onions, minced
1 TBSP vegetable oil
2 TBSP ketchup
1/4 cup thick teryaki sauce (I used Kikkoman brand)
1 tsp barbeque sauce (I used Bulls Eye brand because it's not as vinegar-y as some other brands)
1 tsp lime juice
2 dashes Worcestershire sauce
1 smidge cinnamon (a smidge is about half a pinch or, if your spice is in a shaker jar, one light shake)
1 smidge ginger powder
1 smidge red pepper flakes
1 pinch black pepper
4 large soft, good quality white buns 

Method:
1. Slice the pork into very thin slices, then into pieces around 2cm long or so
2. Heat a large pan over medium-low heat (if your burner dial has 8 increments, put it at about 4). Add the oil, green onion and pork and cook, stirring frequently, until pork is cooked through and no longer pink (7-10 minutes)
3. Make the sauce. Add all the remaining ingredients (except the buns) in a small bowl and mix thoroughly with a fork. Add to the cooked pork
4. Turn the heat to high and bring mixture to a boil. Simmer, stirring frequently, until the sauce is reduced and thickened and clings to the meat (about 12-15 minutes)
5. Slice each bun in half and top with a quarter of the meat mixture. Enjoy!


Saturday, 14 July 2012

Featured Recipe

For some reason, I have a lot of eggs in my fridge. And they will all hit their expiry date before the end of the month and I didn't want them to go bad. Solution: crustless quiche! The nice thing about a crustless quiche is that it is way lighter and does not have the heavy greasiness of a pastry crust, so it is nice even on a summer day.  Plus, it takes way less time to prepare. A meat thermometer is handy for this dish as the eggs need to be at least 160 degrees Fahrenheit to be fully cooked but not over 180 or they will turn kind of rubbery. 


Crustless Quiche

Ingredients:
6 large eggs
2 TBSP 1% milk
salt and pepper to taste
1/4 green (or red) pepper, finely diced
1 cm wide section red onion, finely diced
1/4 cup bacon bits
1/4 cup grated cheddar cheese
cooking spray or vegetable oil

Method;
1. Pre-heat the oven to 400 degrees F
2.  Crack eggs into a medium size bowl. Whisk with a fork together with salt, pepper and milk. Set aside
3. Spray a 9x9 pan with cooking spray (or brush lightly with vegetable oil). Put peppers, onion and bacon in the bottom of the pan and pour the egg over top
4. Top with grated cheese and bake for 20 minutes (eggs need to be at least 160 degrees F but not more that 180 degrees F) 
5. Let cool for 5 minutes, then cut into squares


Here are a few other flavour variations to try:
  • mushroom, spinach and gruyere
  • ham, broccoli and swiss
  • sundried tomato, basil, mozzarella
  • turkey sausage and monterey jack cheese
  • mild Italian sausage (pre-cooked), red pepper, parmesan and mozzarella 

Wednesday, 4 July 2012

Featured Recipe

I ADORE apple crisp. A lot. The soft apples, the cinnamon, the crunchy granola topping....yum! And my mom makes the very best apple crisp in the world. Sadly, my husband cannot eat cooked apples so I do not make it very often. Plus, it's a lot of work to have just 1 person eat it. So.....I have come up with a 1 serving version that is super quick, low carb, low fat and totally delicious!

Guiltless 5 Minute Apple Crisp

Ingredients:
1 medium McIntosh apple (soft apples like McIntosh work best)
2 shakes of cinnamon
1 tsp brown or white sugar
2 TBSP Kashi Go Lean Crunch cereal or other granola (Go Lean Crunch is the best for this but Harvest Crunch would be good too)

Method:
1. Peel apple and cut into bite-sized pieces. Place in a microwave safe bowl and sprinkle with the cinnamon and sugar
2. Cook in mircowave on high heat for 1 minute. Stir and cook for another 30 seconds or so.
3. Top with cereal and let sit for 1 minute to cool.

For an added treat, top with vanilla ice cream or vanilla yogurt

Sunday, 17 June 2012

Featured Recipe

Today's recipe is a variation on basic baking powder biscuits but they are more like a scone than a biscuit. They are sweet but not too sweet and have a pleasant texture. They are particularly good warm from the oven with a bit of butter. I substituted vegetable oil for the traditional shortening as I hate cutting in shortening - it does give it a spongier texture than shortening, but it is much faster and less hassle.  I added Peach/Passionfruit curd that I had in my pantry, but you could add apricot or peach jam instead. The curd is nice because it is made with butter and it is not as sticky as jam. Lemon curd would be really lovely too. You could add blueberries or blackberries instead of raspberries if you wanted.   

Peach/Passionfruit Raspberry Biscuits

Ingredients:
3-3/12 cups all purpose flour
3 teaspoons baking powder
1 tsp salt
1 TBSP white sugar
1/2 cup vegetable oil
1 cup peach/passionfruit curd
3/4 cup milk
3/4 cup frozen raspberries

Method:
1. Mix together 3 cups of the flour, the baking powder, salt and sugar in a medium sized bowl
2. Add the veg oil, milk and fruit curd. Mix well. Add the frozen raspberries and mix well. The dough should be really soft and a bit sticky, If it is too sticky, add more flour
3. Gently pat about 1/2 cup of the dough into a disc about 1.5 cm thick and about 6-8cm in diameter. Place on an ungreased cookie sheet. Repeat with remaining dough, leaving about 3 cm between biscuits. It should make between 9-12 biscuits
4. Bake at 450 for 8 mins, then turn the pan 180 degrees (so the the biscuits that were at the front of the oven are now at the back) and bake for 5 mins more. They will be light golden on the top and a rich brown on the bottoms when they are done.
6. Let cool at least 10 mins before serving. Freeze any leftovers


Experiments in the Kitchen

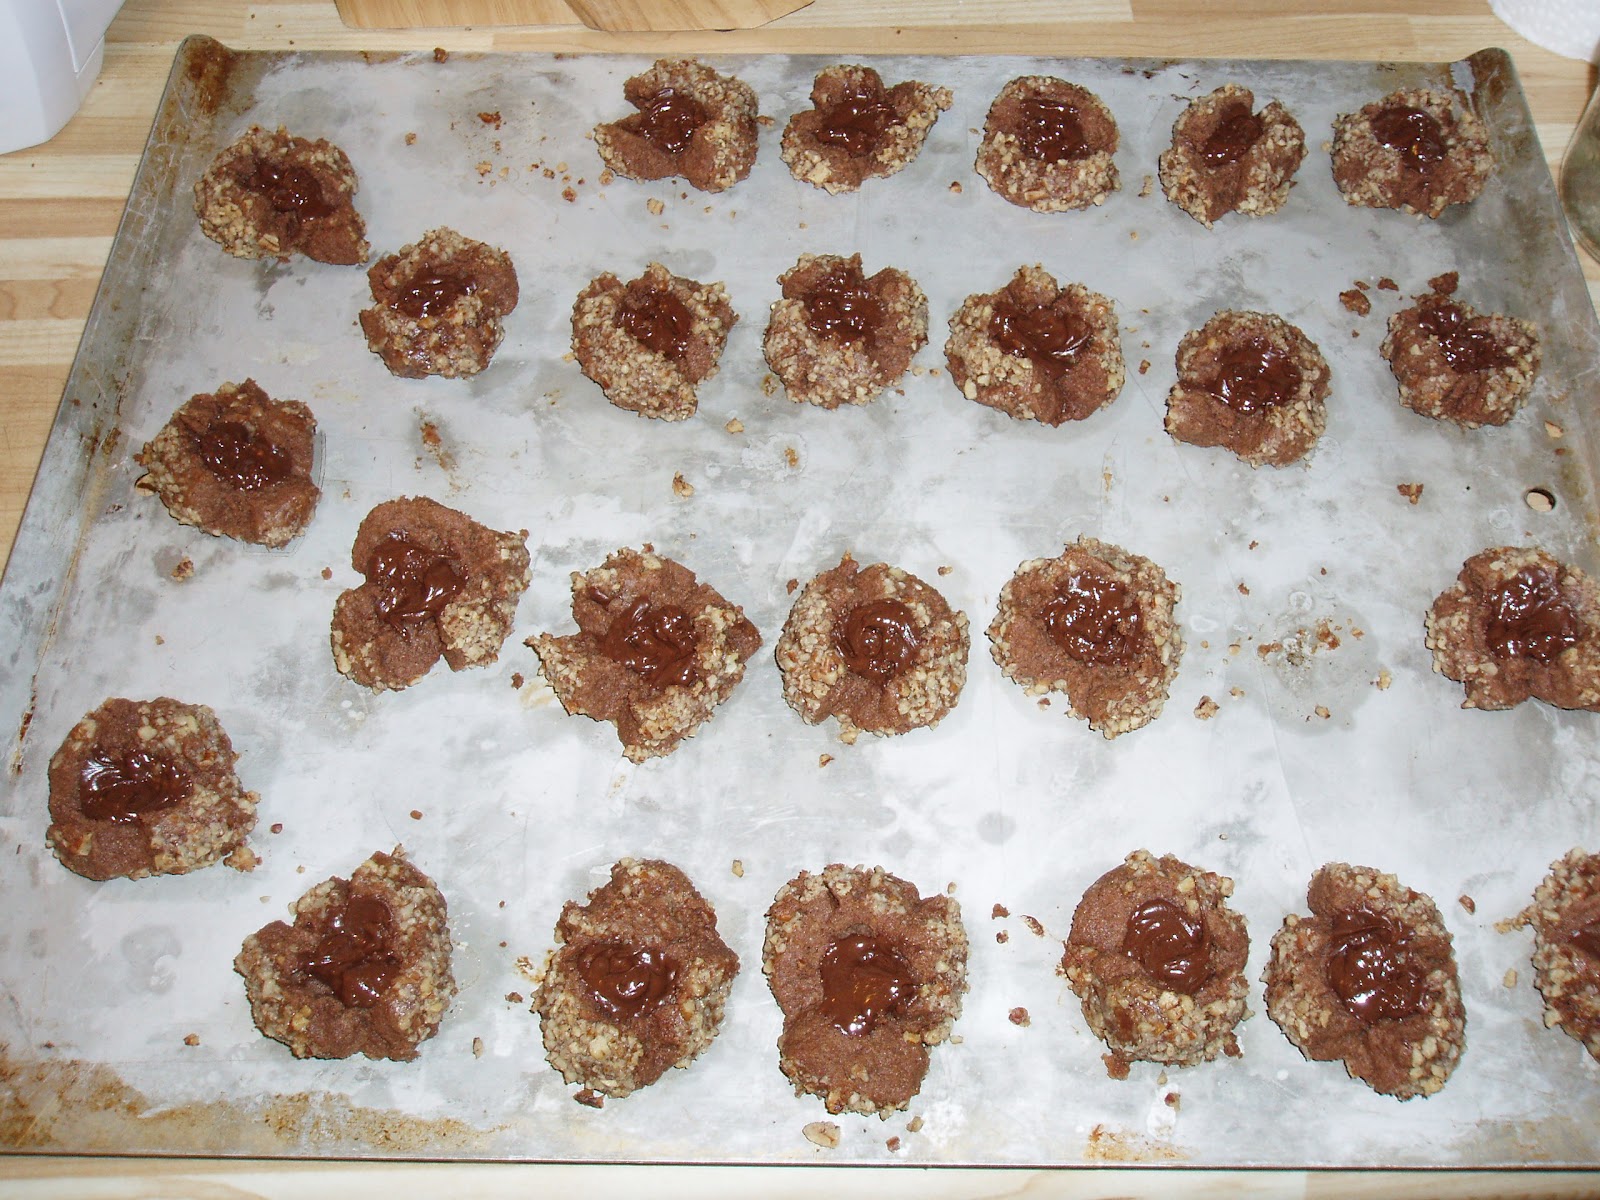
 Today was a gloomy, grey day - perfect for baking. I wanted to make cookies so I asked my husband what kind he wanted and his suggestion was Chocolate Thimble Cookies. I make these at Christmas every year and they are his favourite (they're one of my favourites too), but I ended up giving most of them away this year and I did promise him I would make a batch just for us. It is now June....I guess it was time.
Chocolate Thimble Cookies are made with a chocolate dough that you roll into balls, then in nuts (pecans are best), the when they're on the baking sheet, before they go in the oven, you make a depression in the middle with your finger. When they come out of the oven, you put 4-5 chocolate chips in the depression and when they melt, you swirl them with a toothpick. (A traditional version of these cookies are called thumbprint cookies and are usually a white dough with jam in the middle). 

Experiment #1:

Terr's suggestion was to make the dough chocolate/peanut butter - I can't believe I had never thought of this before! I figured I could just substitute half the butter for peanut butter and everything would be good. Yeah, that didn't work too well. My dough was really dry and crumbly and was impossible to roll into balls. I ended up adding more butter (in total about 3/4 of what the original recipe called for) and even then they we drier than they should have been. I managed to roll them, though they did fall apart a wee bit when I tried to put the depression in. They actually managed to hold together fairly well as they baked and weren't too dry to enjoy. The flavour was incredible and I would totally do it again. Lesson: substituting peanut butter for butter does not work. Next time, add the full amount of butter, plus the same amount of peanut better. If I need to add more flour, so be it.
Was it a success? Yes! Just a few minor tweaks and they'll be perfect!


Experiment #2:

I also wanted something that I could take in my lunches to have for my coffee break. I toyed with the idea of muffins, but decided on biscuits in the end. But, of course, I couldn't make just plain baking powder biscuits - I was in a creative mood. I settled on Peach/Passionfruit Raspberry biscuits. I had a jar of Peach/Passionfruit curd in my pantry and some frozen raspberries. I had to adjust the amount of flour becuase of the curd and the raspberries, but they totally turned out. They're a little spongier than normal biscuits and are more like a scone.   
Was it a success? Totally! They are delicious and will be nice in my lunch.So good, in fact, that they are this week's featured recipe!


Monday, 21 May 2012

Featured Ingredients

I have learned that not everyone is a "foodie" like me and may not know what all the ingredients I refer to are. So, here is another installment of "get to know new ingredients:

Quinoa
Quinoa is a lovely grain (technically it is a seed more than a grain and it is not a part of the grass family) that cooks up quick like couscous (10-15 minutes) and, to top it off, it is packed with protein (unlike rice or beans, it is a complete protein; you would need to eat rice and beans together to get a complete protein). Quinoa originated in the Andes of South America and was cultivated by the Incas who referred to it as the "mother of all grains." It has a somewhat nutty flavour and can be used in place of couscous or rice and is great in salads, soup and other side dishes. It has also been made into flour and pasta as a gluten-free option (these products can usually be found at health food stores). It must be cooked before you eat it.

Uncooked Quinoa seeds
Cooked quinoa

Proscuitto
Prosciutto is an Italian dry-cured ham that is usually very thinly shaved. It is nicely salty and tastes a bit like bacon but is much leaner. A classic Italian dish is melon (often cantaloupe) wrapped in prosciutto. I like to wrap chicken breast with it, put it on pizza or fry it until crispy to put in salads.


Cumin
Cumin is an ancient spice originally cultivated in the Mediterranean, Middle East and parts of North Africa (Egypt and Morocco). It can be purchased in both its original seed form, or ground into a powder (I have never used the seeds, only the powder). It has an intense smoky, earthy flavour (but no heat) and is very good in chili, Mexican/Latin style dishes and Indian curry. A little goes a long way

Cumin Seeds

Ground cumin
Monterey Jack Cheese
This is probably my favourite type of cheese. It is a semi-hard (like Cheddar), white, cow's milk cheese with a kind of mildly tangy flavour (as opposed to a "sharp" flavour like cheddar). It melts really well and I love it on pizza (though not as stretchy/stringy as mozzarella). We also like a variety called Jalapeno (or pepper) Jack cheese that has bits of jalapeno peppers mixed in. Gives a nice bit of heat.

Montery Jack cheese
Jalapeno Jack


Featured Recipe

Two featured recipes in one day! I must be hungry or something. This recipe was inspired by a recipe I found in an Australian Women's Weekly cookbook for Chicken Margherita (chicken breasts stuffed with bocconcini cheese (soft mozzarella), spinach, tomatoes and pesto and then wrapped in proscuitto and baked) which is really, really good, but we've recently discovered that my husband gets sick when he eats tomatoes and spinach. Unfortunate, but I can change. I wanted the taste of this chicken, but without using spinach or tomatoes. My version uses Monterrey Jack cheese, dried oregano and minced onion. Turned out awesome (and sooo cheesy)! It sounds a bit complicated, but it isn't really. Served it with Warm Vegetable Quinoa Salad (which I'm also including the recipe for).


Cheesy Prosciutto Wrapped Chicken

Ingredients:
4 boneless, skinless chicken breasts (fillets attached)
8 slices prosciutto
8 slices Monterrey Jack cheese (about 5mm thick)
dried minced onion (about 2 tsp total)
dried oregano (about 2 tsp total)

Method:

1. Pound chicken with a mallet (the bottom of a heavy frying pan works too) until the chicken is an even thickness of about 1.5 cm
2. On the side of the breast opposite the fillet, make a horizontal cut down length of the breast with a sharp knife so that you have a pocket large enough to put a piece of cheese in. Be careful not to cut all the way through the chicken. Place a piece of cheese in the pocket you created and sprinkle with a bit of the onion and oregano. Fold the chicken over the cheese to enclose it in the pocket
3. Flip the breast over and place a second piece of cheese in the natural pocket between the breast and the fillet (you may need to use your knife to make the pocket big enough for the cheese). Sprinkle with the oregano and onion
4. Wrap 2 slices of prosciutto around the chicken breast enclosing the cheese. Place in a glass baking pan (brush with olive oil)
5. Repeat steps 2, 3 and 4 with the remaining chicken
6. Bake at 425 degrees Fahrenheit for 25-30 minutes until the chicken is cooked all the way through (should reach 165 degrees on a meat thermometer). The cheese will ooze out somewhat during cooking but that's ok, just scoop it out of the pan and spread in on top while it's still melty.

Warm Vegetable Quinoa Salad

Ingredients:
1/2 cup uncooked quinoa
1 cup chicken broth
1/2 each green and red peppers, diced
2 green onions, diced
1 TBSP olive oil
1/2 tsp each pepper and salt
1 tsp Johnny's Garlic Seasoning

Method:
1. Cook quinoa according to the package directions, but substitute the water for chicken broth
2. While the quinoa is cooking, sautee the peppers in the olive oil. sprinkle with salt and pepper. Cook for about 5-7 minutes until the peppers are warm through but still crunchy. Add green onion and cook for 1 minute more
3. Mix veggies with quinoa and sprinkle on garlic seasoning. Stir and serve warm